
Video Tutorial Finite State Machine with Robot
In this video I invite you to discover the principle of finite state machines with the Robot library.
The problem
As usual, it is important to understand the problem before taking an interest in a bookstore. For that, let's take a concrete example: The github title editing system.
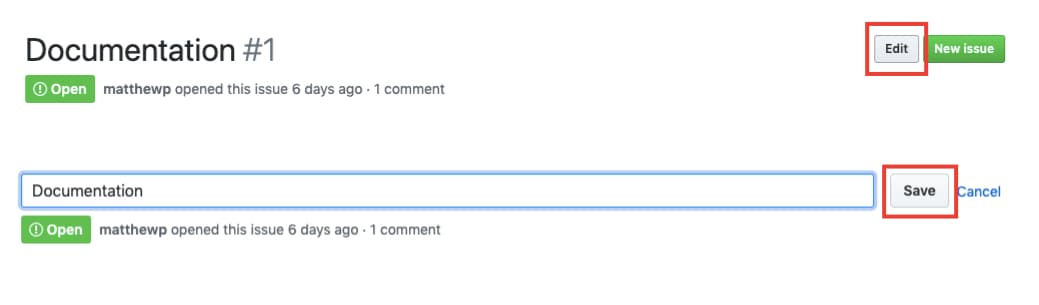
This interface initially offers 2 states that one would be tempted to represent via a simple boolean.
let editMode = true
When we click on the button Edit the boolean changes value to become true and it becomes false when we click on Save or Cancel.
Unfortunately, this approach is too naive. Indeed the controls and the buttons must be deactivated when you click on Save while we wait for the API to return.
let editing = true
let isLoading = true
An indicator should also be displayed in the event of success and an error in the event of a problem.
let hasError = true
let hasSuccess = false
We must also check if the value of the field has been modified to allow sending.
let isDirty = true
The problem now is that you have to synchronize all these booleans with every change of state.
const handleSuccess = (newTitle) => {
    setTitle (newTitle)
    setError (false)
    setSuccess (true)
    setDirty (false)
    setLoading (false)
    setEditing (false)
}
A finite state machine brings a new approach to declaring the state of our components. This approach also helps to avoid invalid states and errors caused by the wrong combination of boolean.
Robot bookstore
Now we need a library to describe our machine and we are going to look at the Robot library. We start by defining the different states:
import {
  createMachine,
  state
} from "robot3";

export default createMachine ({
    idle: state (),
    edit: state (),
    loading: state (),
    success: state (),
    error: state (),
});
Then we will create transitions that allow to pass from one state to another.
import {
    createMachine,
    guard,
    invoke,
    reduce,
    state,
    transition,
} from "robot3";

export default createMachine (
  {
    idle: state (
        transition ("edit", "edit")
    ),
    edit: state (
        transition ('cancel', 'idle'),
        transition ('submit', 'loading', guard (isTitleValid)),
        transition ('input', 'edit',
            reduce ((ctx, ev) => ({... ctx, title: ev.target.value}))
        )
    ),
    loading: invoke (
        syncDataWithServer,
        transition ("done", "success"),
        transition ("error", "error",
            reduce ((ctx, ev) => ({... ctx, error: ev.error.message}))
        )
    ),
    success: invoke (() => wait (2000), transition ("done", "idle")),
    error: state (
        transition ("dismiss", "edit"),
        transition ("retry", "loading"),
    ),
  }
);
It may seem longer at first, but this way of defining our system offers several advantages:
- Our system cannot be in an invalid state.
- All possible states are defined upstream.
- States and transitions can be validated via robot / debug.
Integration into a framework
Once your machine is defined you can easily integrate it into a Front end framework. For this, we will use the method interpret which allows to create a new instance of our machine. This method will take as parameter a method which allows to listen to the changes of states.
// React / Preact hook example
import {useCallback, useRef, useState} from "react";
import {interpret} from "robot3";

export function useMachine (machine, initialContext = {}) {

  // We create a new instance of the machine
  const ref = useRef (null);
  if (ref.current === null) {
    ref.current = interpret (
      machine,
      () => {
        setState (service.machine.current);
        setContext (service.context);
      },
      initialContext
    );
  }
  const service = ref.current;

  // We store the context & the state of the machine in the react state
  const (state, setState) = useState (service.machine.current);
  const (context, setContext) = useState (service.context);

  // Used to request a transition
  const send = useCallback (
    function (type, params = {}) {
      service.send ({type: type, ... params});
    },
    (service)
  );

  // Check if a transition is possible from the current state
  const can = useCallback (
    (transitionName) => {
      const transitions = service.machine.state.value.transitions;
      if (! transitions.has (transitionName)) {
        return false;
      }
      const transitionsForName = transitions.get (transitionName);
      for (const t of transitionsForName) {
        if ((t.guards && t.guards (service.context)) ||! t.guards) {
          return true;
        }
      }
      return false;
    },
    (service.context, service.machine.state.value.transitions)
  );
  return (state, context, send, can);
}
Finally here is an example of what gives the Github editing component with this machine.
import React, {useCallback} from "react";
import Box from "./ui/Box";
import Title from "./ui/Title";
import Button from "./ui/Button";
import {useMachine} from "./useMachine";
import machine from "./machine";
import TextField from "./ui/TextField";
import Flex from "./ui/Flex";
import Alert from "./ui/Alert";
export default function EditableTitle ({title}) {
const (state, context, send, can) = useMachine (machine, {title});
const editMode =! ("idle", "success"). includes (state);
const dismiss = useCallback (() => {
send ("dismiss");
}, (send));
return (
{state === "success" && (
The title has been saved
)}
{state === "error" && (
{context.error}
)}
{! editMode? (
{context.title}
): (
send ("input", {value: e.target.value})}
fullWidth
/>
)}
{editMode? (
): (
)}
);
}


 — Formation Symfony 7")


 — Formation Symfony 7")
 — Formation Symfony 7")
